How I Transitioned from Ease to Spring Animations

Publicatie: 5 december 2019
Geschreven door: Joost Kiens
Lessons learned while building react-spring visualizer.
One strong point of react-spring is that it supports physics-based animations, especially those based on springs. These types of animation feel very natural. However, coming from using eases and durations in CSS and libraries such as GSAP, there was a lot that I didn’t get at first.
React-spring’s configuration accepts properties such as tension, mass, friction and velocity. While I sort of understood the meaning of these words, I had no idea what they meant in the context of a spring animation. Which values would I need to give them to hit that sweet spot, where the animation feels just right?
So I built a tool to help me visualize how these values impact an animation: react-spring visualizer. In the process of building this tool, I tried to understand how spring based animations work. Below are the things I’ve learned along the way.
By the way, the same things apply to any spring animation, not just react-spring. They are just as relevant if you use React-Motion, Framer motion or Anime.js.
First, a Refresher on Easing
When you think of an object, for example a car, that goes from A to B, it will not immediately reach full speed and it won’t stop immediately when it reaches its destination. Instead it will slowly increase speed, reach its top-speed and slow down before eventually coming to a halt. It will ease in and ease out.
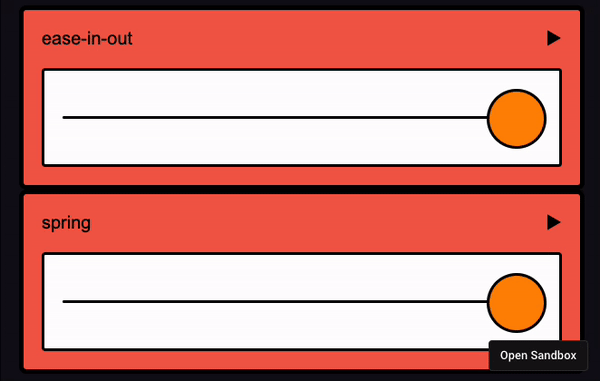
The same goes for UI elements, compare the two animations below:
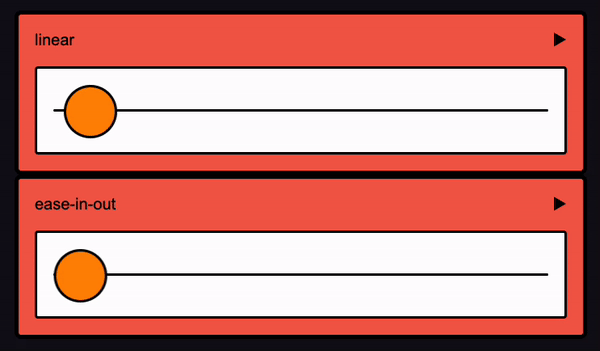
The top one, which moves at a constant speed, feels mechanical and a bit awkward. The bottom one eases in when starting, reaches full speed and eases out before arriving at its destination. Since this mimics the movement of the car above, it feels more natural.
CSS, GSAP, anime.js, even jQuery come with some preset eases, so it’s safe to say most frontend developers are familiar with them. A good list of commonly used eases can be found in this Easing Functions Cheat Sheet.
So How do Ease-based Animations Work?
An animation with easing always needs at least 2 things: a duration usually expressed in seconds or milliseconds and an easing function representing a curve.
Here’s an example of an easing curve named quadIn:
1function quadIn(t) {
2 return t * t;
3}
It’s a quadratic function, that’s why it’s called quadIn. If you plot the curve of this function it would look like this:
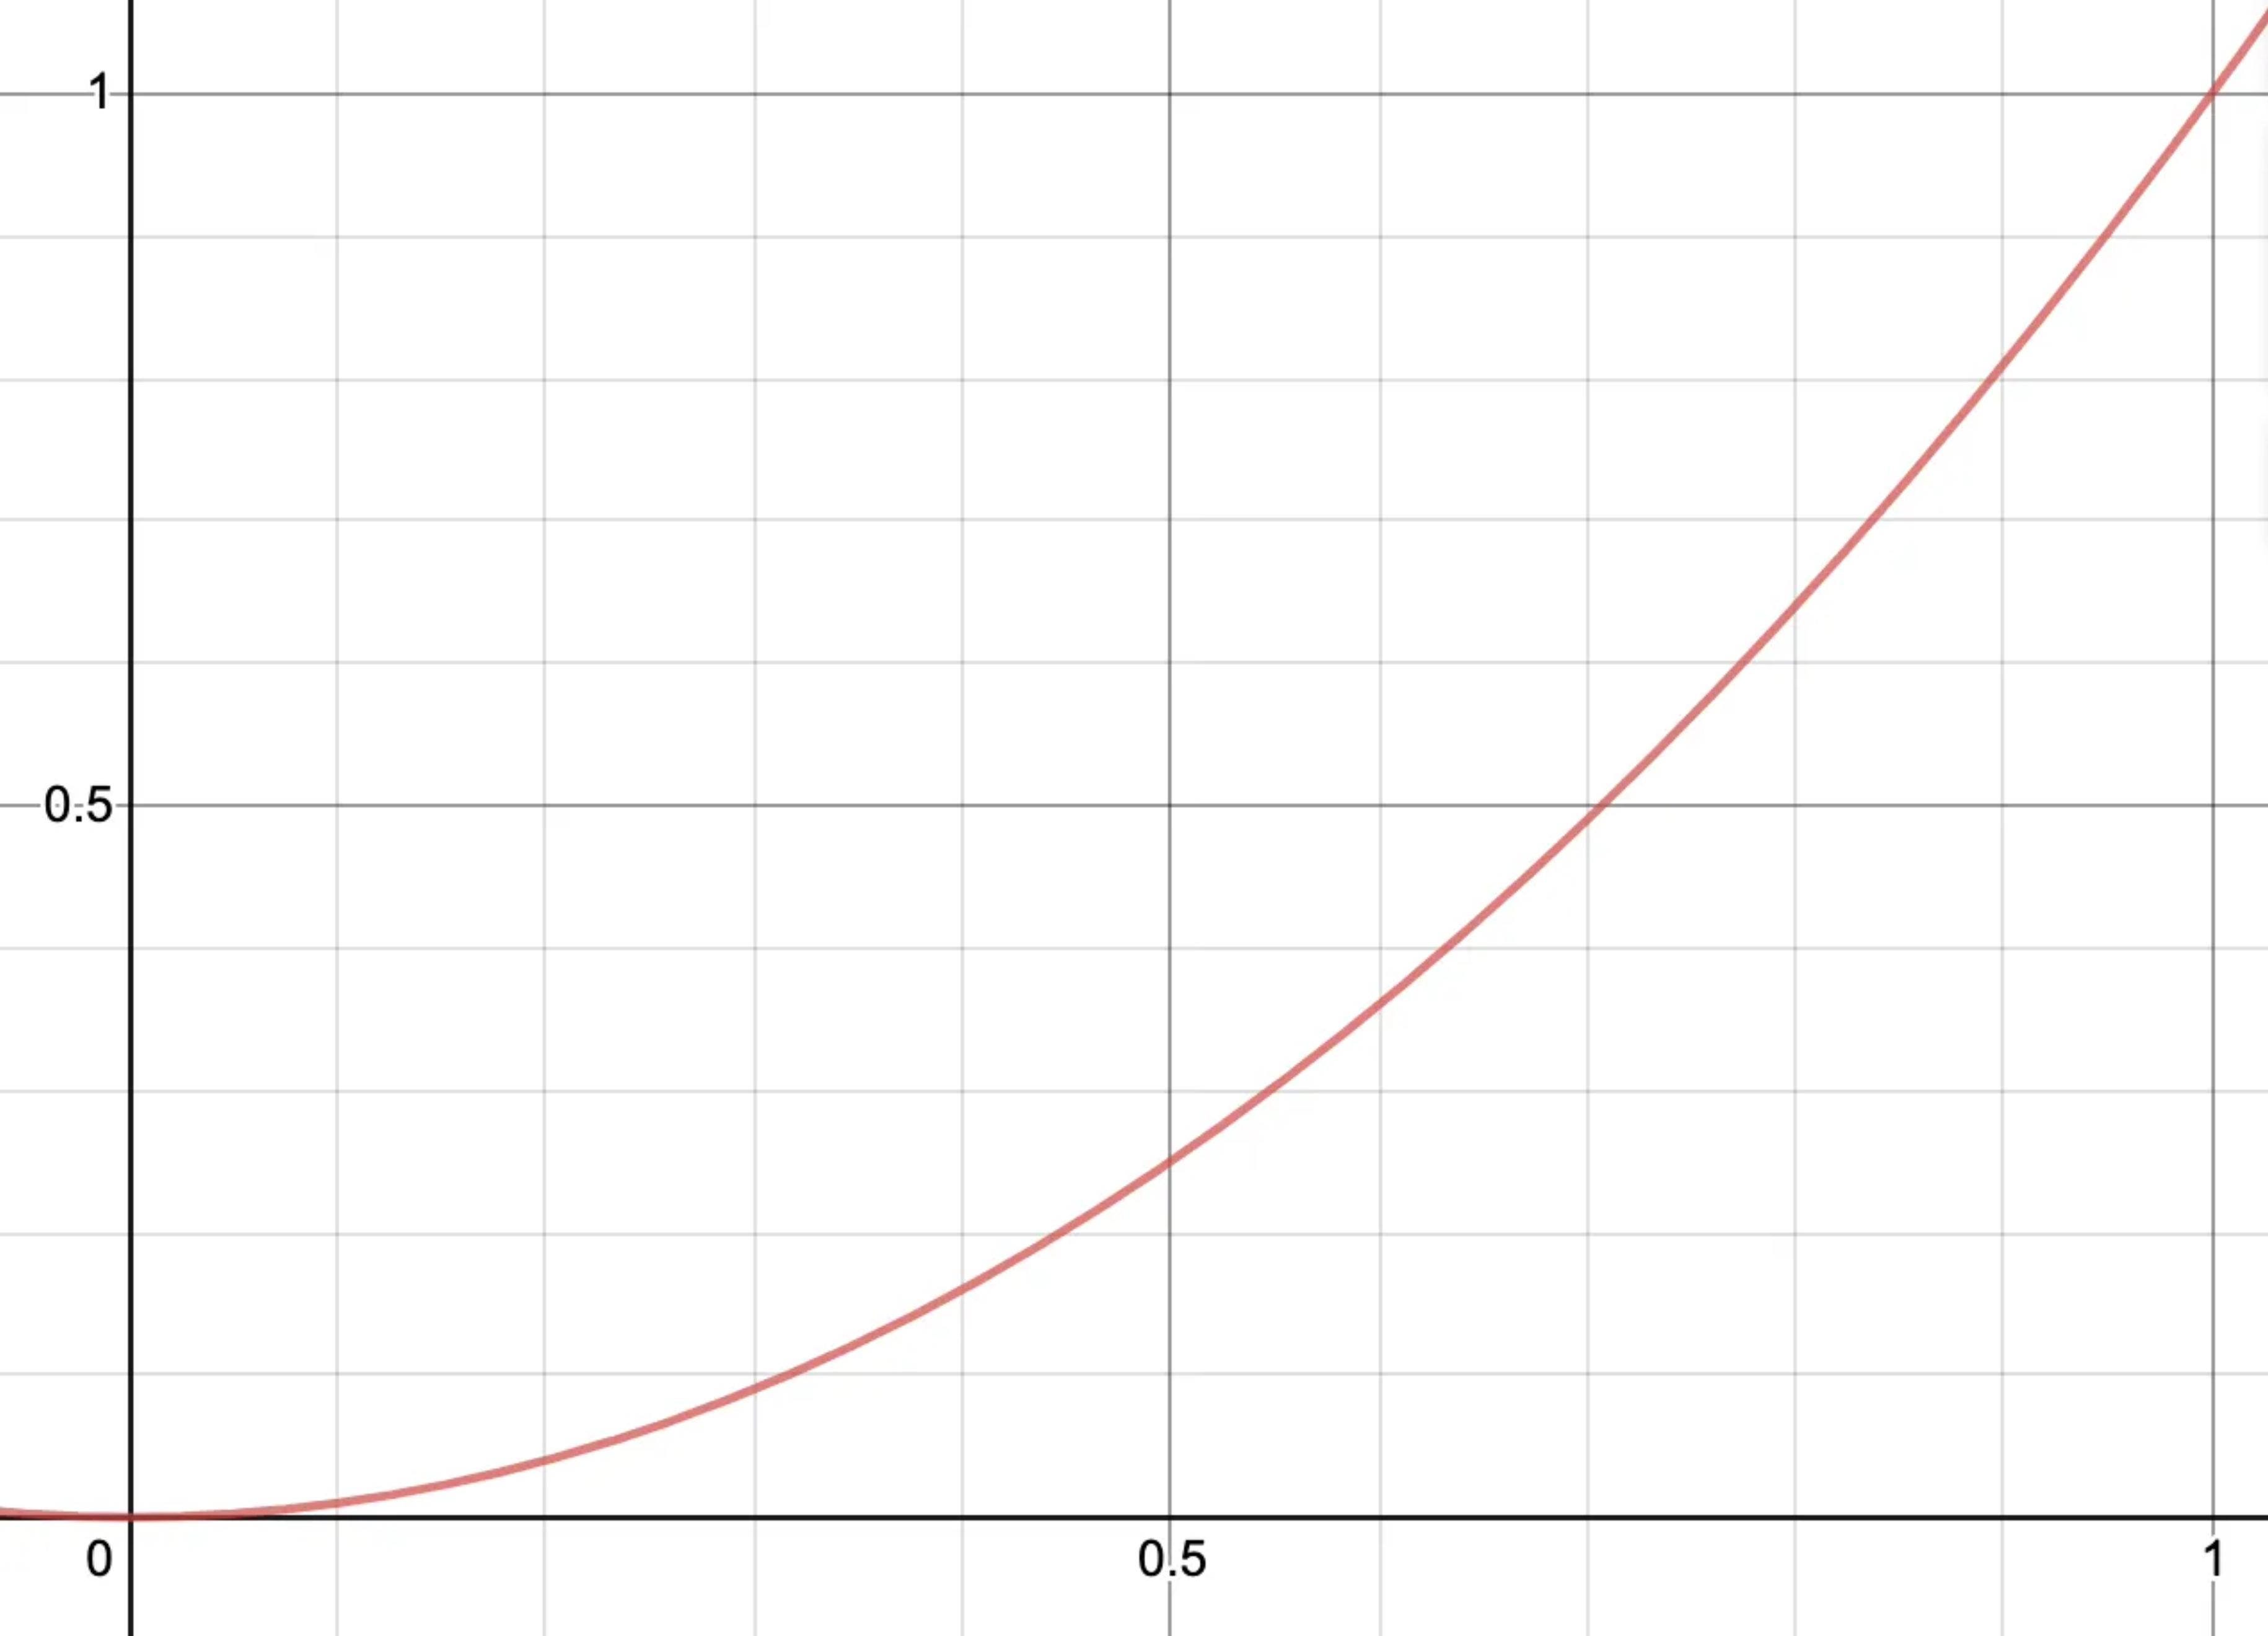
The start of the progress of the animation is 0 and the end is 1. If you would move a variable called x from 0 to 400 pixels in 750 milliseconds, you would calculate the current position for each frame by interpolating between the values like this:
1function update(delta) {
2  const t = (delta / 750)
3  return quadIn(t) * 400
4}
Delta is the time since the start of the animation, so after after 200 milliseconds x would be roughly at 28.4 pixels.
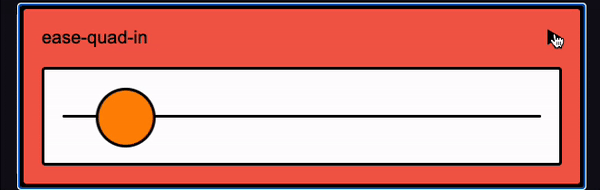
1const x = (200 / 750) * (200 / 750) * 400 // ≈ 28.4After 700 milliseconds x is at 348.4 pixels, and so on. Below is an example of a quadIn animation.
By the way, above I stated we are interpolating between values. An animator might express the same principle by saying they are inbetweening or tweening between keyframes. It took me an embarrassingly long time to realize where all these terms originated 🤷♂️.
Why use Spring Animations?
While eases look a lot nicer than linear animations, there’s still something unnatural about them; things in the real world rarely move according to a fixed duration and a mathematical function.
For example, what would the easing function of a falling object be? Easing functions are an approximation of how things move in the real world. But we can do better!
In order to mimic how physical objects move, we have to look at… well, physics. And one aspect of physics is especially useful when working with UI animations: the way springs move.
Spring animations are very useful for UI animations.
- Physics-based animations feel more natural than ease-based animations.
- Spring animations are more intuitive compared to ease-based animations..
- Physics-based animations are interruptible.
- Because spring animations take an initial velocity, they are well adapted to go from a swipe or drag to an animation after release.
It’s no wonder they are used extensively in native apps on Android and especially iOS, but for some reason the web trails behind. If you are interested in learning why spring animations work so well, I can highly recommend this talk by Apple engineers.
For a comparison, see the two animations below:
So How Do Spring Animations Work?
Earlier we saw that for ease-based animations we check every frame: what’s my position based on this time and this function?
Spring animations work a bit differently: each frame we check: based on our current position, velocity, mass, tension, and friction what will the position be in the next frame?
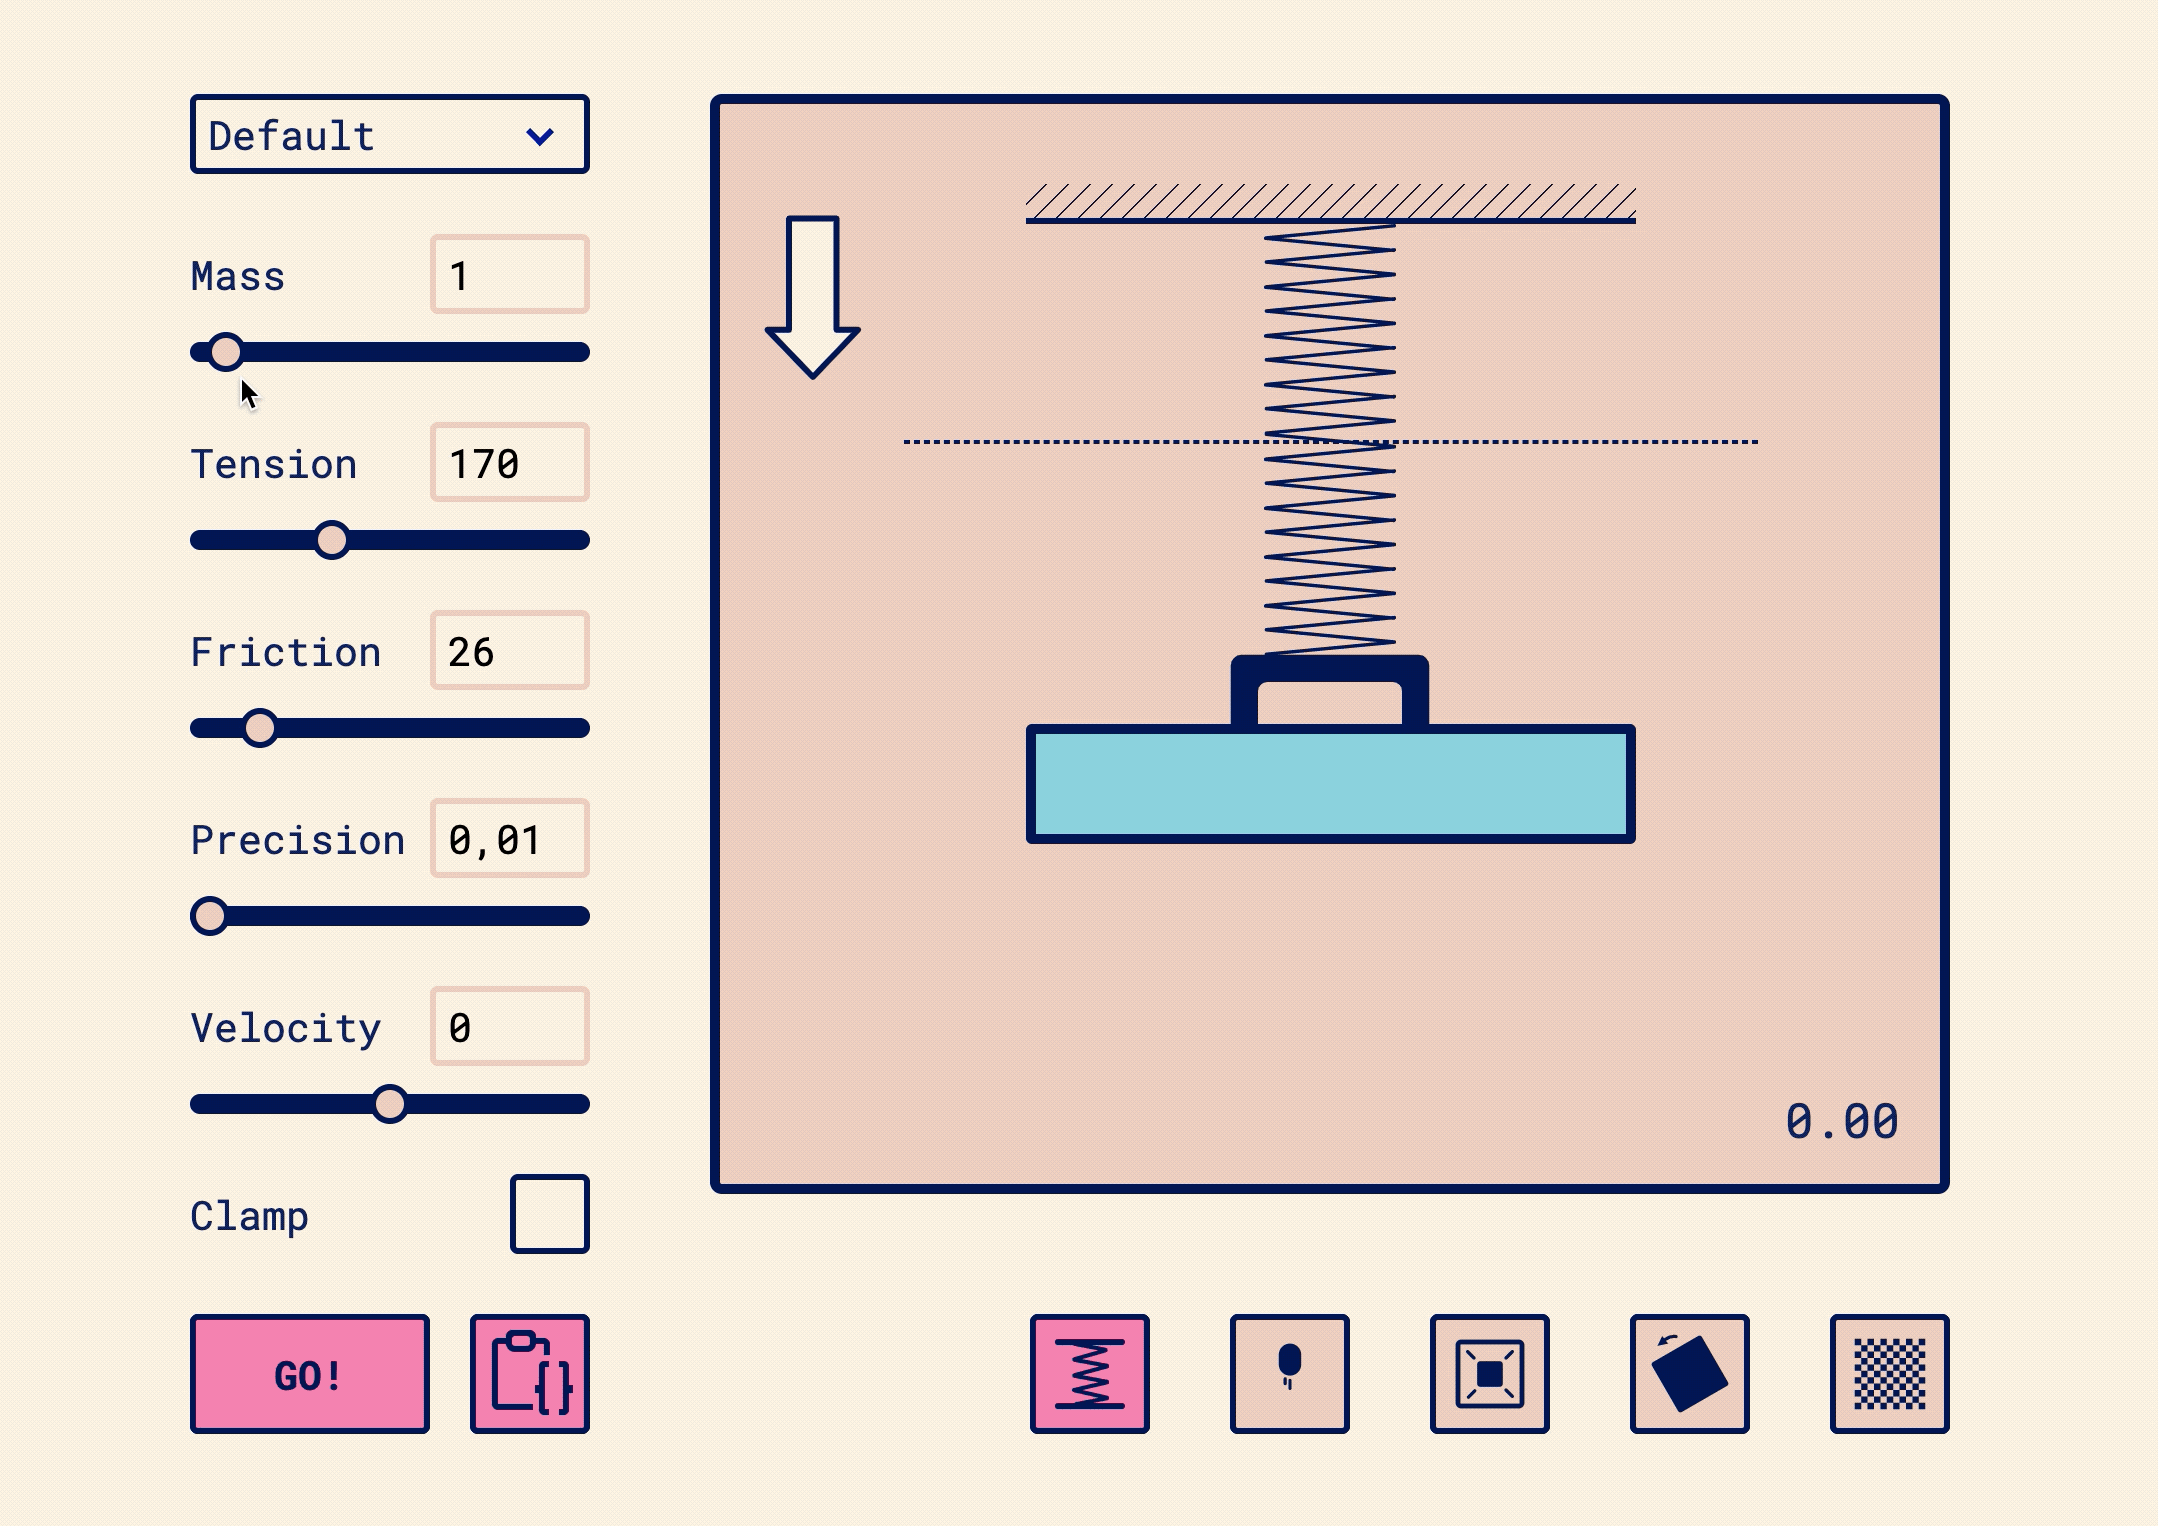
In order to do that we need to know a few properties, like mass, tension, friction and velocity. In react-spring these are defined in the config. It looks like this:
1const props = useSpring({
2   from: { progress: 0 },
3   to: { progress: 400 },
4   config: {
5    tension: 170,
6    mass: 1,
7    friction: 26,
8    velocity: 0,
9    precision: 0.01
10  }
11})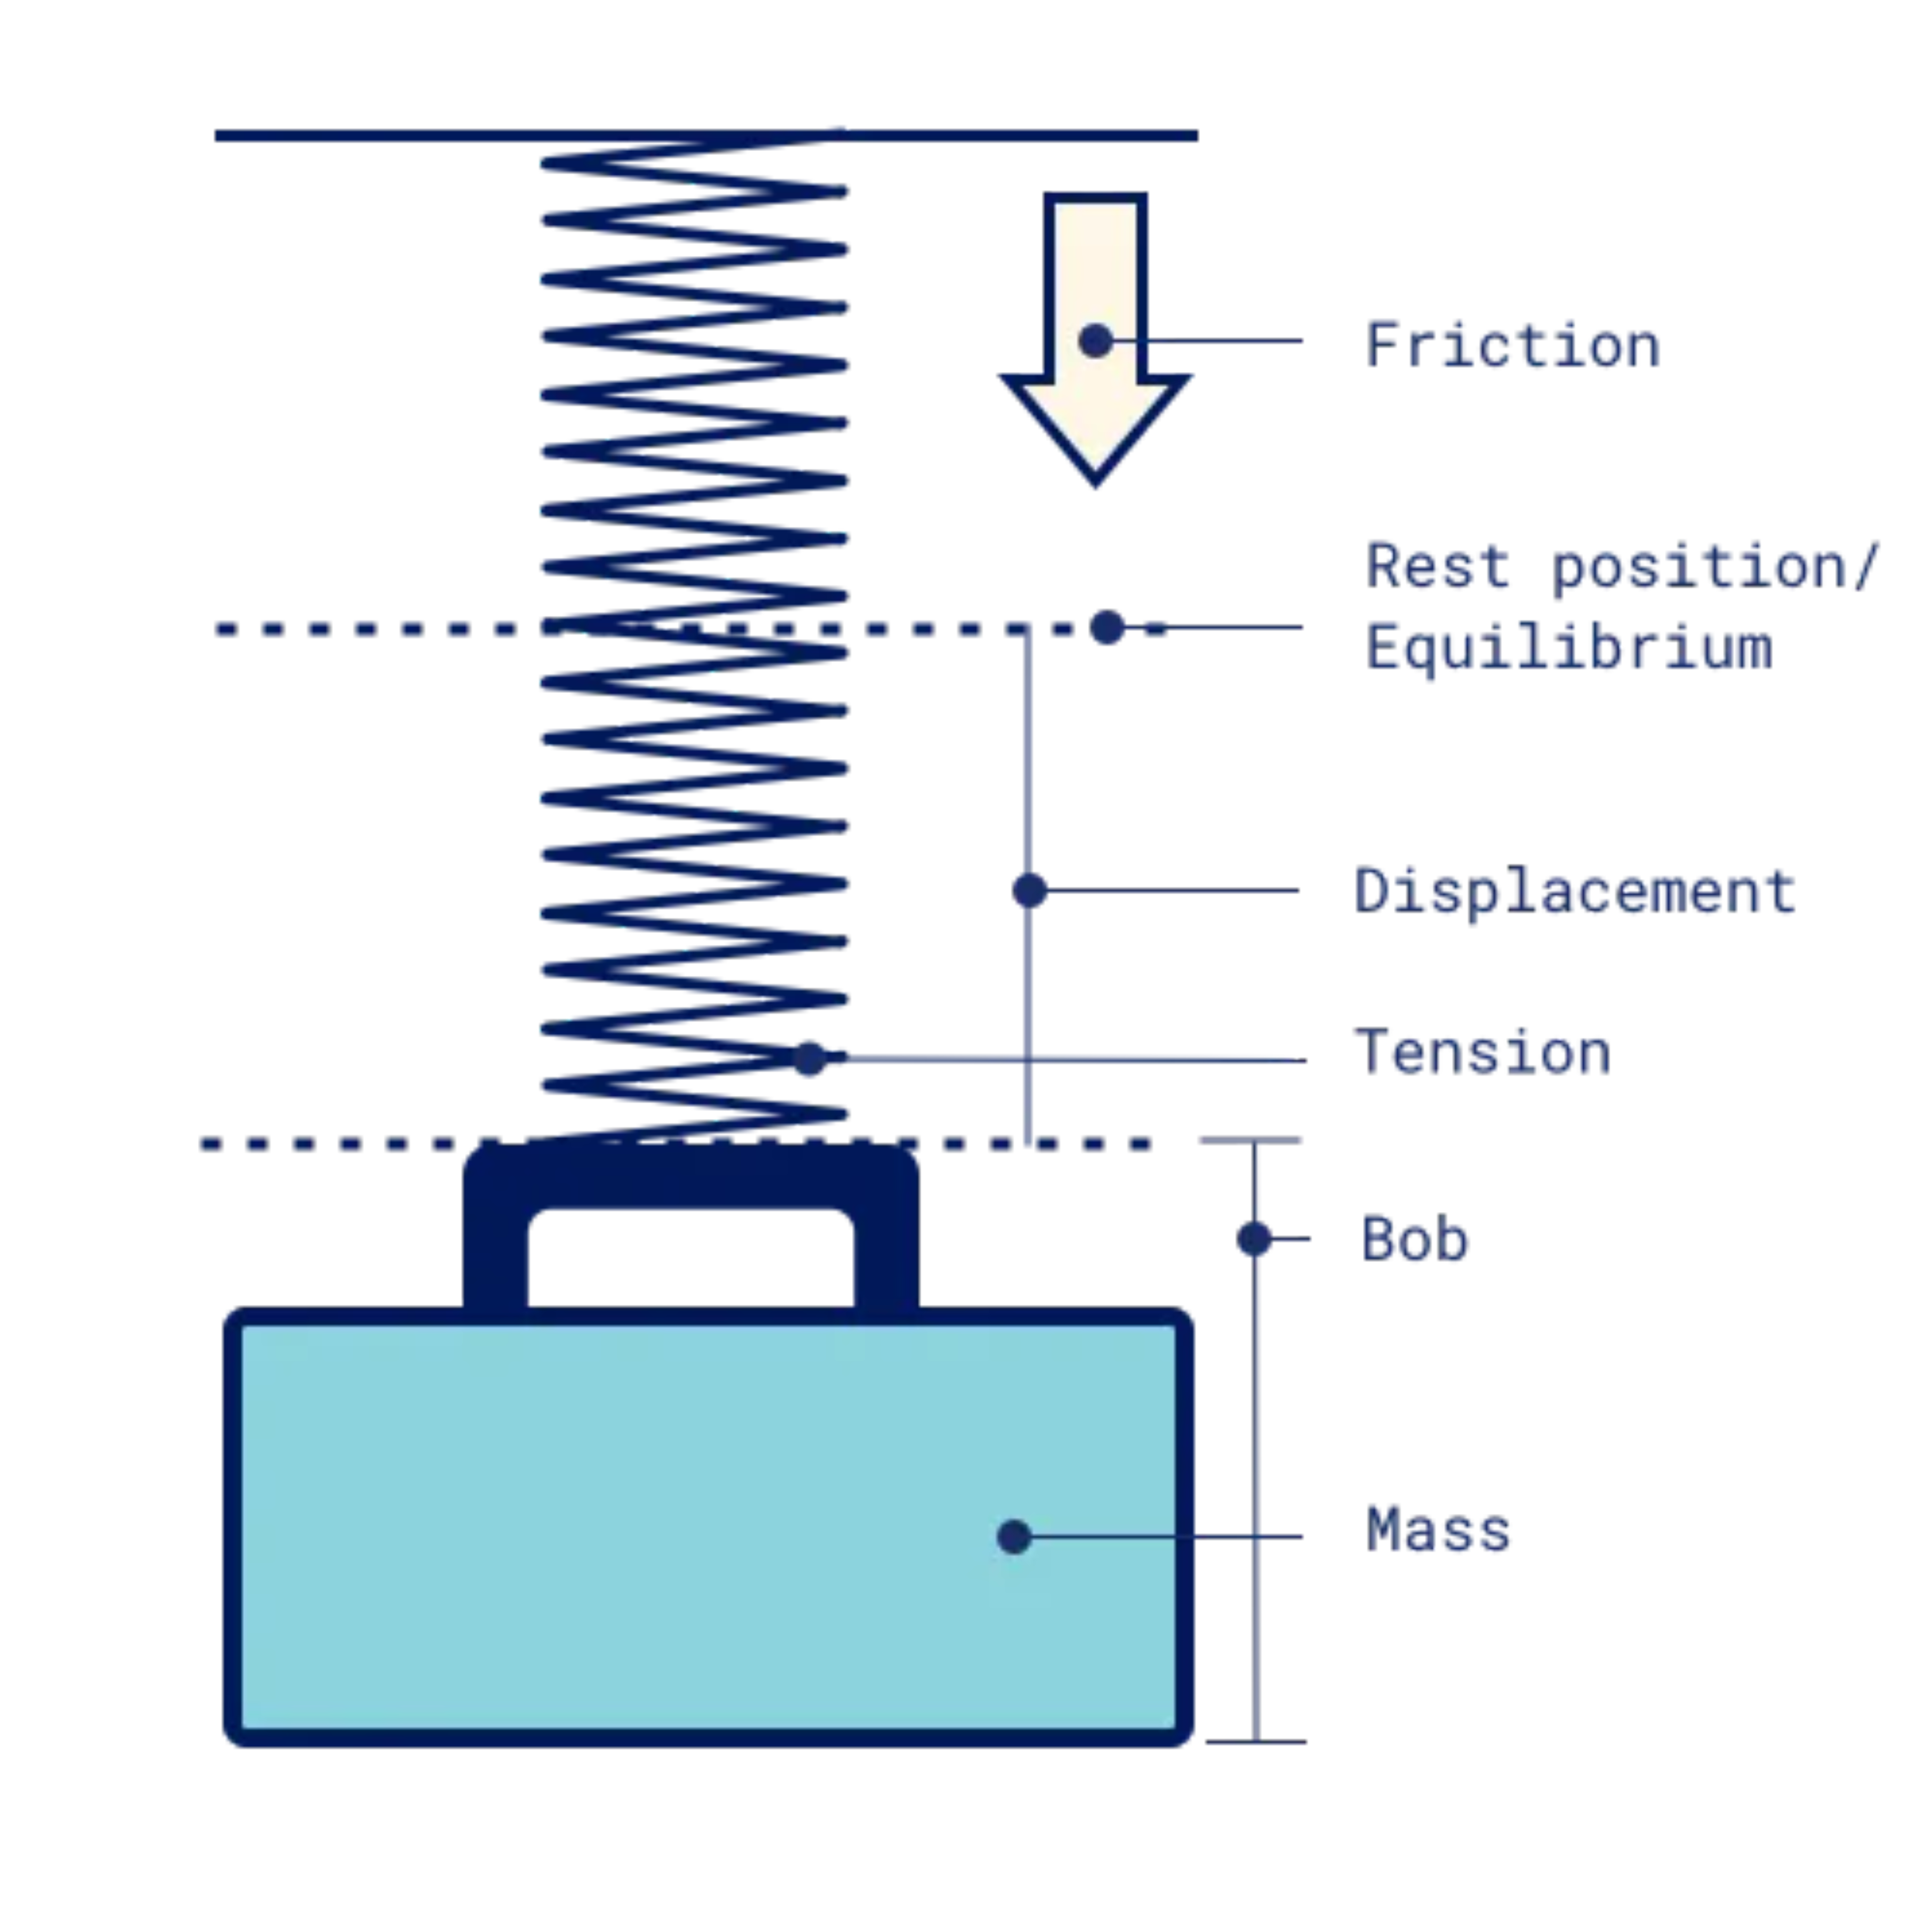
So what do these terms mean?
Imagine you have a spring hanging from a ceiling with a “bob” on the end. If the spring is at rest, it is at its resting point (or at equilibrium). Pull the bob down.
Mass will be the mass of this bob. While not technically the same, you can think of it as the weight.
The spring itself has a property called tension. This is a constant and in the real world is determined by the spring’s material, the thickness of the coils, etcetera. Sometimes this is also called rate, spring constant or stiffness.
Friction is a force acting on the bob reducing the motion of the spring. I prefer to think of it as the density of the surrounding medium, for example air. Air would have lower friction than water or molasses. This is also sometimes referred to as damping.
Then there’s the velocity, which is the initial velocity or speed the spring has when it is released. As if you give the bob a push. Or a pull for a negative velocity.
When the spring reaches its resting point it will bounce around for a while. With each iteration the amplitude will be smaller. Precision is the amplitude at which the animation is stopped.
The physics
So if our starting point is 0, how do we get to 400 with these config values?
We first calculate the spring force (Fs), by using Hooke’s law: Fs = kx.
Where k is the tension of the spring and x is the displacement. The displacement is the distance between the current length of the spring and the spring length at rest (see image above).
1const displacement = currentPosition - toPosition
2const springForce = -tension * displacement
Next, we determine the friction force:
1const frictionForce = -friction * currentVelocityWhere currentVelocity is the velocity in the current frame, not the initial velocity in the configuration.
From here we can calculate the acceleration, the new velocity and finally the new position, using the equations of motion.
1const acceleration = (springForce + frictionForce) / mass
2const newVelocity = currentVelocity + acceleration
3const newPosition = currentPosition + newVelocity
In the next frame the newVelocity and newPosition become the currentVelocity and currentPosition.
All together it looks something like this:
1let velocity = config.velocity
2let position = from.progress
3update()
4function update() {
5  const tensionForce = -tension * (currentPosition - toPosition)
6  const dampingForce = -config.friction * velocity
7  const acceleration = (tensionForce + dampingForce) / mass
8  velocity = velocity + acceleration
9  position = position + velocity
10  if (Math.abs(position - to.progress) > precision {
11    window.requestAnimationFrame(update)
12  }
13}
Note: this is a very simple example. The folks behind react-spring use a few tricks to make the results more accurate and performant. You can see their code here.
And that’s the way the spring springs.
Building react-spring visualizer
When I set out to build react-spring visualizer, at first I wanted to use a chart, similar to the excellent ease visualizer from GSAP. But because we are not working with predefined curves and durations, it didn‘t feel right. So I chose to show the effects of the parameters in a spring.
I have added some visualizers for the most common types of animations: transforms (opacity, translate and rotate) and opacity. Those are the properties I use most of the time when animating DOM elements, since they can be modified by compositing alone and don’t trigger expensive repaints.
While building this tool, I had the chance to take deep-dive into spring animations, learning way more than I could ever have from reading the documentation (which is a bit sparse) and examples (which are gorgeous, but a bit complex).
I built the app on top of our own build stack: kaliber/build based on webpack and PostCSS with SSR out of the box. It’s highly opinionated, but requires zero configuration and it’s open source!
We use it for all our projects with React, but also for our WordPress based projects. One really cool feature is how it allows you to easily have smaller React applications inside a WordPress site with data from the CMS.
I was allowed to spend some time at work writing this article, as long as I plugged our job vacancies 😁. If you have read this far you’re obviously the kind of person we are looking for, so why not join us as frontend developer at Kaliber?
By the way, if you want to know more about how position, velocity and acceleration work together, I can highly recommend checking out The Nature of Code by Daniel Shiffman. He also has a great video about springs.
Photo by Ani Kolleshi on Unsplash